“RT-Theme 9 / Wordpress Theme ” Documentation by “Tolga Can” v1.0.7
“RT-Theme 9 / Wordpress Theme”
Created: 29/04/2010
By: Tolga Can
Email:
ftolgacan@gmail.com
Version: 1.0.7
Twitter: @ftolgacan
Thank you for purchasing my theme. If you have any questions that are beyond the scope of this help file, please feel free to email via my user page contact form here. Thanks so much!
Table of Contents
- Installation
- Home Page And Portfolio Sliders
- General Options
- Slider Options
- Portfolio Options
- Product Options
- Blog Options
- Contact Page Options
- Dynamic Sidebar Options
- Main and Footer Navigations
- Content Boxes
- RT-Theme Slider Widget
- RT-Theme Box Widget
- RT-Theme News Widget
- JavaScript
- Psd Files
- Sources and Credits
- Version History
A) Installation - top
Step 1) Upload the theme
Upon downloading the .zip file from theme forest you'll have all files inside the theme package. Do not upload the entire file you get from ThemeForest, upload only the theme folder.
There are two ways to upload a theme;
1) Upload By FTP: Login your hosting space via an FTP software and upload the theme folder into wp-content/themes/ under your wordpress installation. Once you've uploaded the theme you can open Open WordPress Admin → Appearance→ Themes page and activate the theme from list.
2) Upload By Wordpress Admin:
- Zip the theme folder
- Open WordPress Admin → Appearance→ Themes
- Click Install Themes tab and hit upload link
- Find the the file you've zipped before and hit install now button
Important Notice!
Theme is using timthumb.php auto resize image script and it needs to have the /cache/ folder is writable. If your images are not displaying on your site please make sure it's writable.
File permitions for thumbnail script
Please change the /cache/ folder permissions to 777.
for detailed instructions http://www.darrenhoyt.com/2008/04/02/timthumb-php-script-released/
Installing WordPress http://codex.wordpress.org/Installing_WordPress
Step 2) Activate the theme
Once you have uploaded the theme, open WordPress Admin → Appearance→ Themes and activate your theme.
Using Themes: http://codex.wordpress.org/Using_Themes
USEFUL INFORMATIONS
 |
Finding page ID |
|
|
URLs of Media Files When you've added new media file, the url appears on the bottom of the page. How to Find the URL for an Image http://www.bestwpthemez.com/wordpress/how-to-find-the-url-for-an-image-937/ |
Screenshot of uploading new media

B) Home Page And Porfolio Sliders - top
You can add your posts, pages or free content into home page slider as slide. Before start to create your slides please be sure you've made your changes on RT-Theme Settings -> Slider Options
|
|
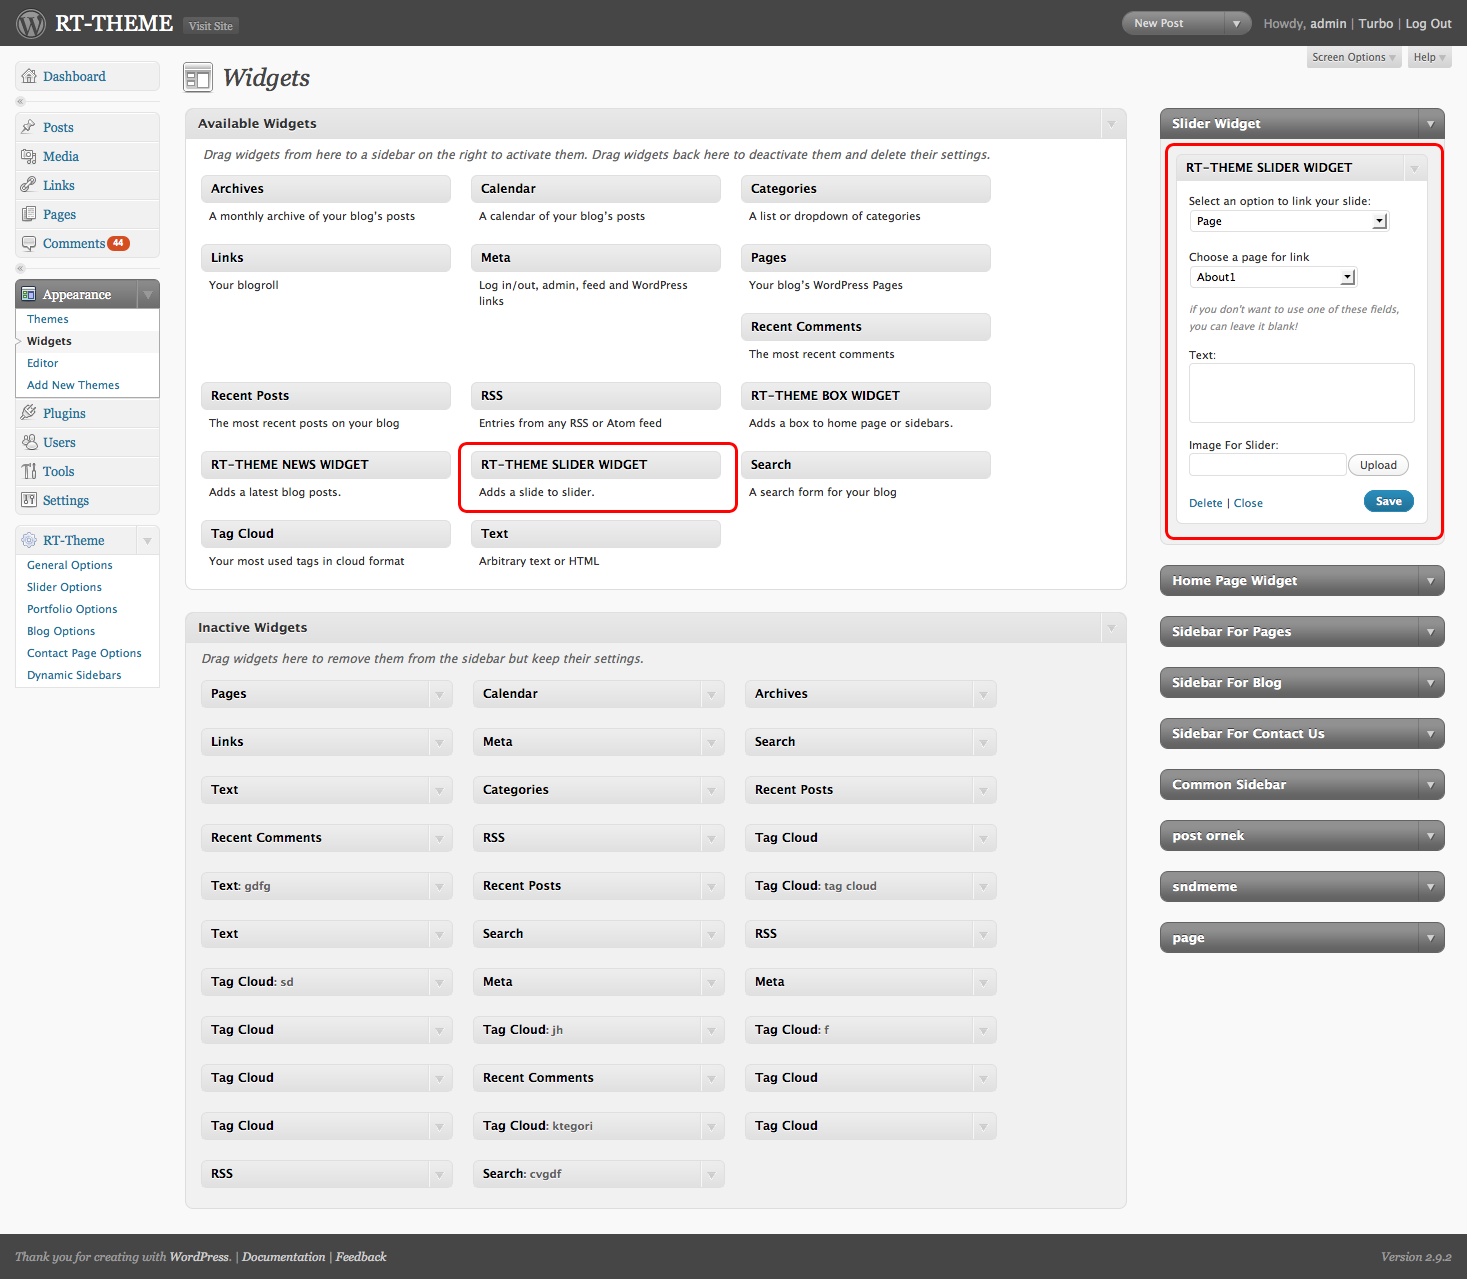
You must use the RT-Theme Slider Widget to add new slide.
|
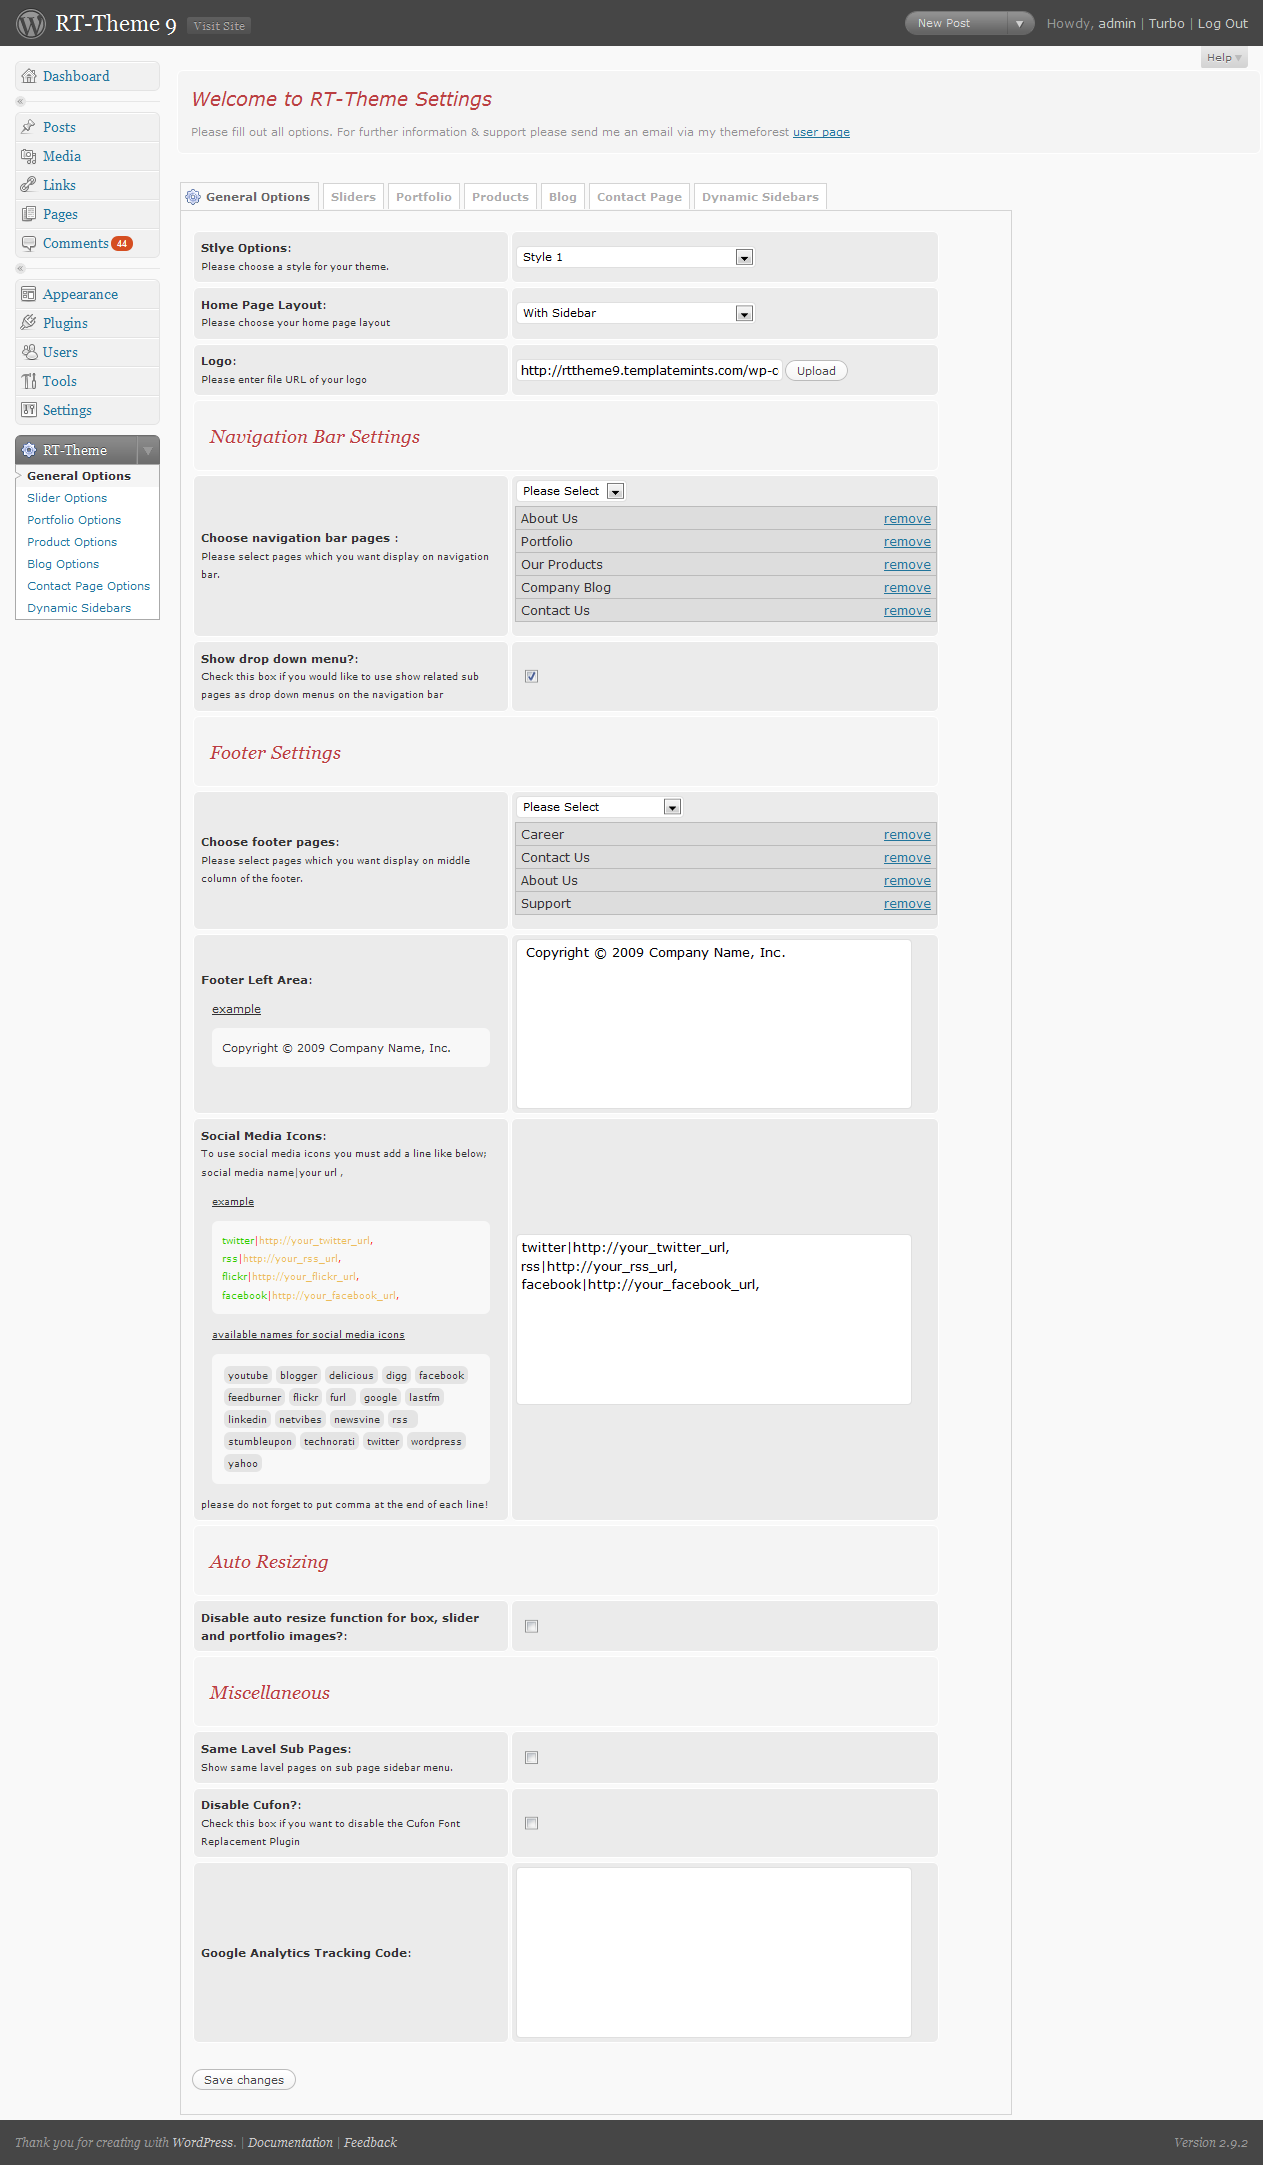
C) General Options - top
| Screenshot | Stlye
and color options: There are too many options for details please see the image on the right. |
|
|
D) Slider Options - top
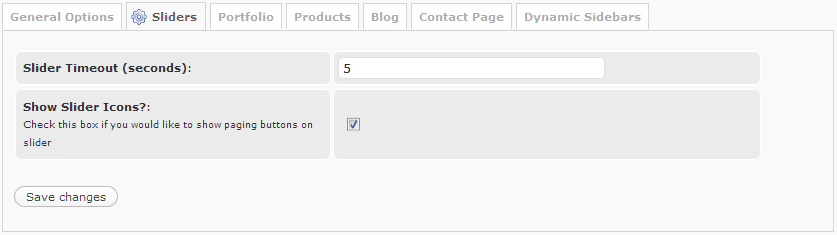
Q. HOW CAN I ADD NEW SLIDES TO HOME PAGE AND PORTFOLIO SLIDERS?
A. PLEASE READ "HOME PAGE AND PORTFOLIO SLIDER" SECTION.
E) Portfolio Options - top
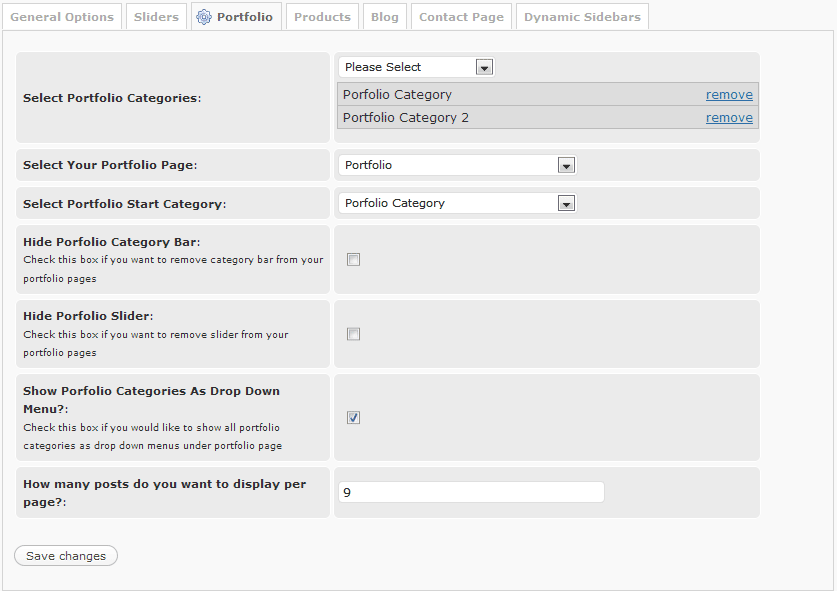
Select portfolio categories:
Select categories which you want to use for portfolio.
The categories that you've been selected will use in portfolio listing
layout.
Select your portfolio page:
"Our Portfolio" link on the menu bar. Chose a page even
if you don't want to use on menu bar, this page is the start page of
your portfolio.
Select Portfolio Start Category:
As default, RT-Theme 9 shows all portfolio items on the portfolio home page. You may want to
show your selected works like "latest works" In case you must
select a start category.
Show Portfolio Categories As Drop Down Menu
If you want to show the selected portfolio categories
under the PORTFOLIO page on navigation, you must check the
box.
Hide Portfolio Slider
Check this box if you don't need a slider on your
portfolio
Hide Portfolio Categories Bar
Check this box if you don't need the bar which shows portfolio
categories.
E1) Adding New Portfolio Item - top
To add new portfolio item add new post and use the RT-Theme Custom Fields for setting up your portfolio item. There are several things you must know;
- If you set a thumnail image the auto thumbnail function automaticly disable for the item.
- If you don't put a link for "Media for blog posts" area the lightbox disable automaticly.
- When adding videos or swf files please use your own thumbnail image.
- Example media url for IMAGE portfolio items
http://www.rtscripts.com/rt-theme4/style1/images/portfolio_pics/thumb2.jpg - Example media url for SWF portfolio items (VIMEO)
http://vimeo.com/4321799 - Example media url for Video portfolio items (YOUTUBE)
http://www.youtube.com/watch?v=qqXi8WmQ_WM - Example media url for QuickTime portfolio items (QUICKTIME)
http://movies.apple.com/movies/wb/terminatorsalvation/terminatorsalvation-tlr3_h.480.mov?width=480&height=204
F) Product Options - top
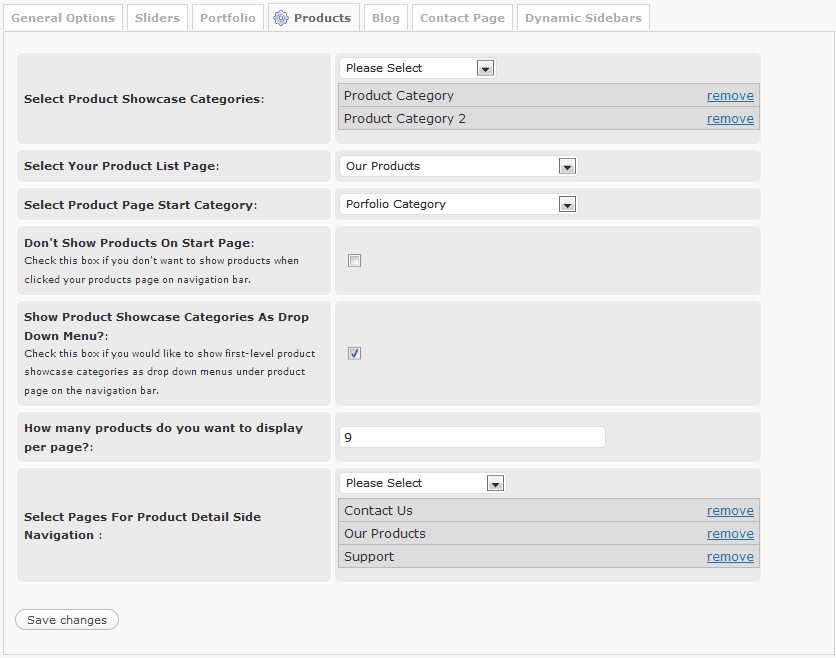
Select product showcase categories:
Select categories which you want to use for product listing.
The categories that you've been selected will use in product listing
layout.
Select your product list page:
"Our products" link on the menu bar. Chose a product list page even
if you don't want to use on menu bar, this page is the start page of
your product showcase.
Select Product Page Start Category:
As default, RT-Theme 9 shows all products on start page. You may want to
show your selected products like "featured products" In case you may
select a start category.
Don't Show Products On Start Page:
If you want to remove products from the start page of product
catalogue check this option. You can put your content in the "product
list page" by using Pages -> Edit
Show Product Categories As Drop Down Menu
If you want to show the selected product categories
under the product list page on navigation, you must check the
box.
Select Pages For Product Detail Side Navigation:
You may want to put shortcuts of your special pages like
"contact with us" or "product inquiry form" etc. you can
select them by using this select box.
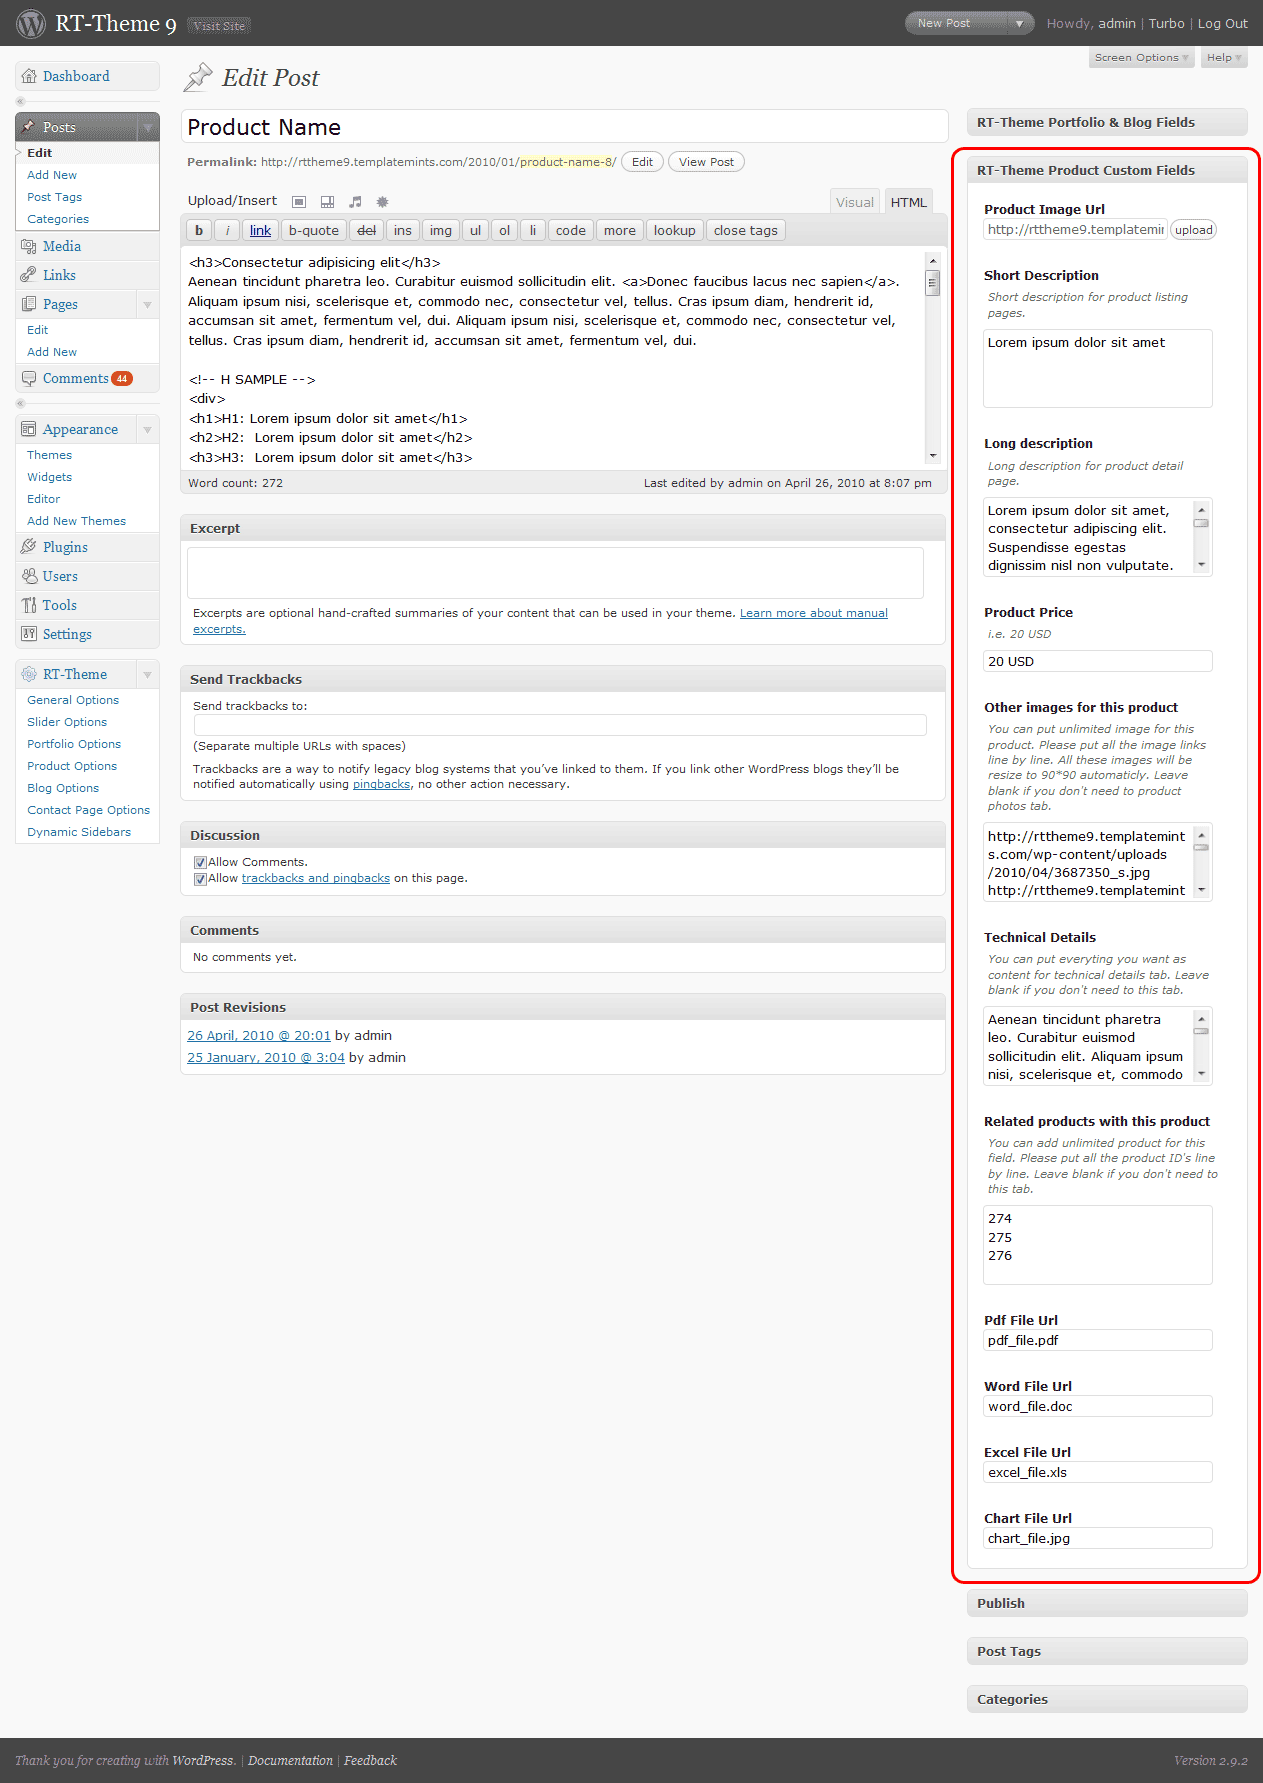
F1) Adding New Product - top
To add new product use the "RT-Theme Product Custom Fields". There are several things you must know;
| Screenshot |
|
|
|
G) Blog Options - top
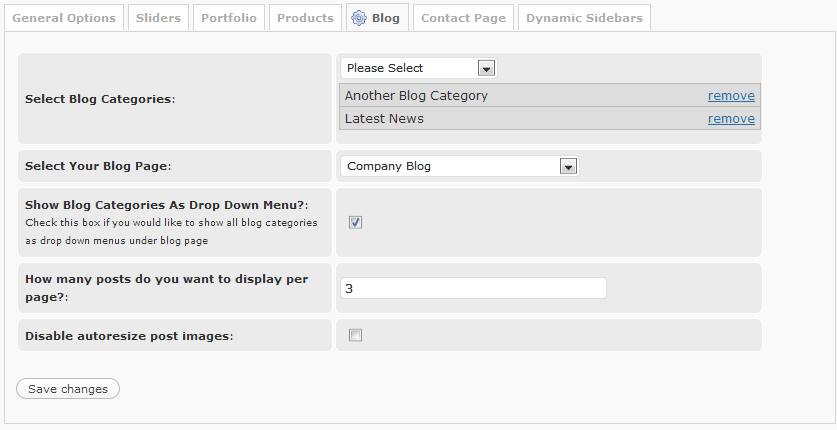
Select categories and a page for blog.
I.E
When clicking the "Blog" page, wordpress will list only posts of
the "Company Blog" category. So, you need the create the categories and
page first.
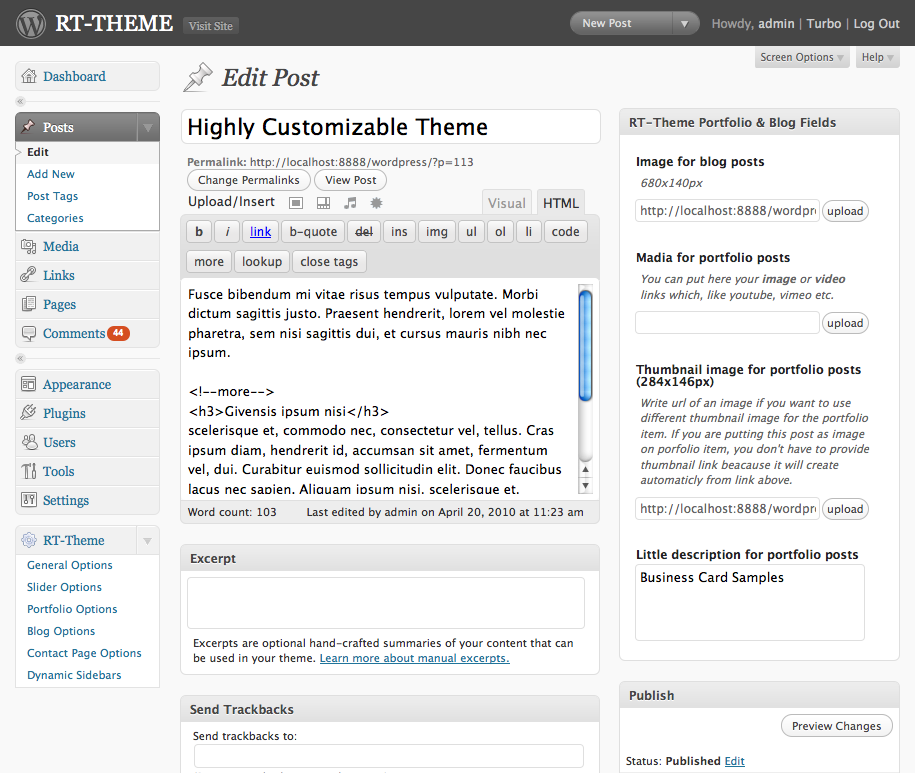
If you want to add a post image for your posts, don't forget the enter
an image url to Image for blog posts option under Porfolio & Blog Fields .
H) Contact Page Options - top
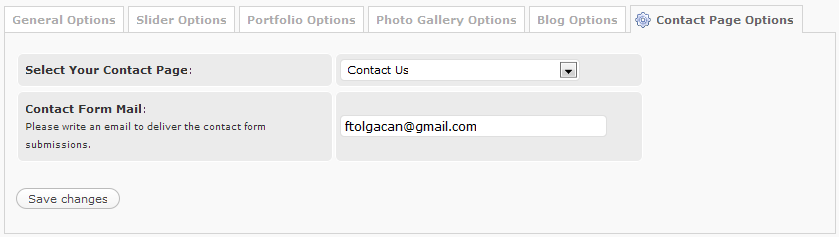
Select your contact page and don't forget to putt your contact email.
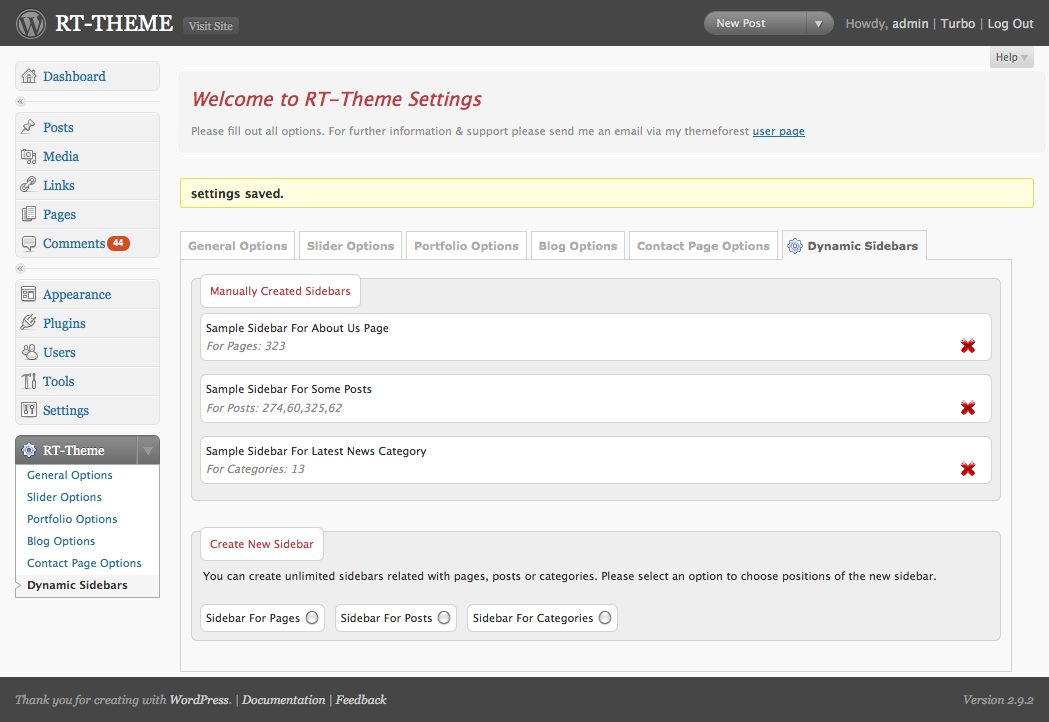
I) Dynamic Sidebars Options - top
There are six default widget areas that you can use for the Slider, Home Page, Page Sidebar, Blog Sidebar, Contact Us Sidebar and All Theme's sidebars. But If you want to use the widgets just for a page or pages or categories or posts you can use the new Dynamic Sidebars Tool. For example, if you want to add latest blog posts or a banner image to you about us page, you can create a new widget area for about us page and use it as you wish.

J) Main, Top and Footer menus - top
There are two embeded menu of the theme; RT Theme Main Navigation and RT Theme Footer Navigation

- Go, Wordpress Appearance → Menu
- Choose the menu you want to edit from the tabs
- Add your items, orginize them and click Save Menu button.
The Appearance Menus SubPanel is available beginning with Worpdress 3.0. If you're new on this new menu feature of wordpress please read this article carefully; http://codex.wordpress.org/Appearance_Menus_SubPanel
To use all items like posts, tags etc. check the Screen Options to insure those modules are set to display.

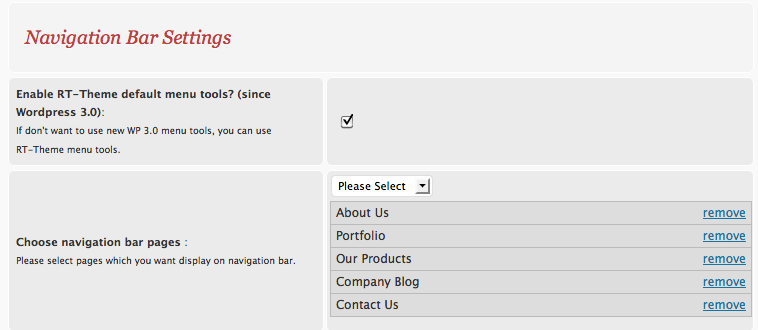
IMPORTANT NOTICE!
If you're already use RT-Theme 9 and upgraded 1.0.5 version you may want to keep using your old menu. In this case open RT-Theme General Options and check the box for Enable RT-Theme default menu tools option. When you save the options page the old menu system will be back.
K) Content Boxes - top
To create a new content box you must use RT-Theme Box widgets which are writen for the RT-Theme. For detailed information please read section K) RT-Theme Box Widgets below,
K1) Adding Contact Details to sidebars like demo page
Drag&Drop an RT-Theme Box widget into a widget
area, choose manual option and put your html list codes like;
		<ul>

		<li><b>Adres: </b> Lorem Ipsum Dolor Sit </li>

		<li><b>Phone: </b> +1 123 123 1233<br /></li>

		<li><b>Fax: </b> +1 123 123 1233<br /></li>

		<li><b>E-Mail: </b> info@companyname.com</li>

		</ul>
K2) Adding Google Maps to sidebars like demo page
Drag&Drop an RT-Theme Box widget into a widget
area, choose manual option and put your embed codes like;
<iframe width="286" height="250" frameborder="0" scrolling="no"
		marginheight="2" marginwidth="2"
		src="http://maps.google.com/maps?f=q&source=s_q&hl=en&geocode=&q=new+york&sll=52.908902,-58.491211&sspn=13.219771,39.506836&ie=UTF8&hq=&hnear=New+York&ll=40.714216,-74.005966&spn=0.065057,0.089264&z=12&iwloc=A&output=embed"></iframe>
K3) Adding Brand Logos to sidebars like demo page
Drag&Drop a TEXT widget into
a widget
area, choose manual option and put your html list codes like;
<ul class="brands">

		<li><a href="#" title=""><img
		src="http://rttheme9.templatemints.com/wp-content/uploads/2010/04/brand_logo.jpg"
		alt="" class="preload" /></a></li>

		<li><a href="#" title=""><img
		src="http://rttheme9.templatemints.com/wp-content/uploads/2010/04/brand_logo.jpg"
		alt="" class="preload" /></a></li>

		<li><a href="#" title=""><img
		src="http://rttheme9.templatemints.com/wp-content/uploads/2010/04/brand_logo.jpg"
		alt="" class="preload" /></a></li>

		<li><a href="#" title=""><img
		src="http://rttheme9.templatemints.com/wp-content/uploads/2010/04/brand_logo.jpg"
		alt="" class="preload" /></a></li>

		</ul>

		<div class="clear_space"></div>
L) RT-Theme Slider Widget - top
What is the RT-Theme Box Widget
I've created tree custom widget plugin for the theme. One of the
is "RT-Theme Slider Widget". This plugin let's you add a
slide to home page
slider. You can add the content
manually or link with page and post. Just drag and drop the widget
"Slider Widget" area and fill options.
- Go to Appearance -> Widgets
- Drag & Drop the RT-THEME SLIDER WIDGET into the widgets areas on the right.
| Sample Usage |
|
|

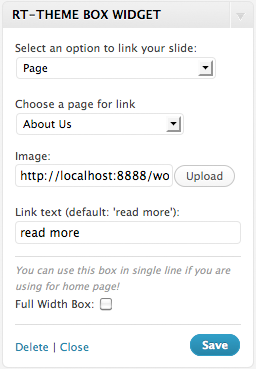
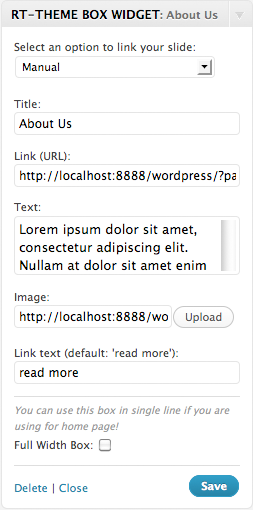
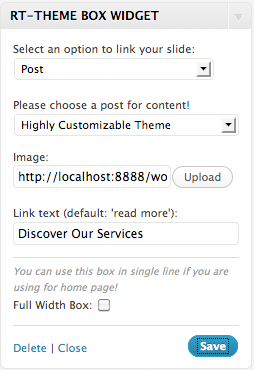
M) RT-Theme Box Widget - top
What is the RT-Theme Box Widget
I've created tree custom widget plugin for the theme. One of the
is "RT-Theme Box Widget". This plugin let's you add content to home page
or all sidebars entire the site as you wish. You can add the content
manually or link with page and post. Just drag and drop the widget where you want
to display on the theme.
- Go to Appearance -> Widgets
- Drag & Drop the RT-THEME BOX WIDGET into the widgets areas on the right.
| Page Option | Manual Option | Post Option |
 |
 |
 |
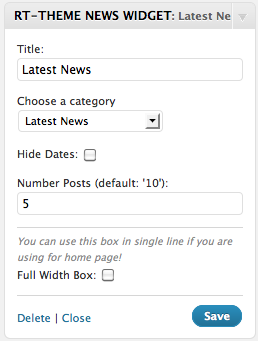
N) RT-Theme News Widget - top
What is the RT-Theme News Widget
The widget let's you add latest posts on the widget areas as
styled for RT-Theme 8
- Go to Appearance -> Widgets
- Drag & Drop the RT-THEME NEWS WIDGET into the widgets areas on the right.
| SAMPLE USAGE |
|
|
O) JavaScript - top
This theme imports these Javascript files.
<script type="text/javascript" src="js/jquery-1.3.2.min.js"></script>
<script type="text/javascript"
src="js/jquery-ui-1.5.2.packed.js"></script>
<script type="text/javascript" src="js/jquery.easing.1.1.1.js"></script>
<script type="text/javascript"
src="js/jquery.cycle.all.min.js"></script>
<script type="text/javascript" src="js/jquery.validate.js"></script>
<script type="text/javascript" src="js/jquery.prettyPhoto.js"></script>
<script type="text/javascript" src="js/cufon.js"></script>
<script type="text/javascript" src="js/anivers_400.font.js"></script>
<script type="text/javascript" src="js/script.js"></script>
1) jQuery http://jquery.com
jQuery is a Javascript library that greatly reduces the amount of code
that you must write.
2) jQuery Cycle - jQuery plugin http://malsup.com/jquery/cycle/
Cylcle script on sliding gallery
3) DD_belatedPNG png fix script for ie6 -
http://jquery.andreaseberhard.de/pngFix/
This is a Javascript library that sandwiches PNG image support into IE6
without much fuss.
jquery.pngFix.pack.js
4) script.js - Coded by Tolga Can
Includes several functions
5) jQuery Easing - jQuery plugin
http://gsgd.co.uk/sandbox/jquery.easing.php
Offers multiple easing options
6) jQuery PrettyPhoto jQuery plugin
http://www.no-margin-for-errors.com/projects/prettyPhoto-jquery-lightbox-clone/
Lightbox plugin
7) jQuery UI http://jqueryui.com
jQuery UI JavaScript Library
8) Cufon
http://wiki.github.com/sorccu/cufon/about
jQuery UI JavaScript Library
P) PSD Files - top
There are 3 PSD files for each color option;
- Background (background.psd)
Use this files for main header background of your style. It has two slice one for center one for repeating background image. - Footer background (footer.psd)
Same as main background use this file for footer of your design. - All Elements (all_elements.psd)
All the other graphics like shadows, lines, buttons etc.
Using Slices PSD files
If you'd like to change the the main design elements
(shadows, lines buttons etc.) open "all_elements.psd", make your adjustments, then save the by choosing "save for web"
to saving method. When you've finished, photoshop will generate an
"image" folder that contains all the image files as i named. Copy
replaces the images (not folder) in the images folder of the
theme.
Q) Sources and Credits - top
I've used the following images, icons or other files as listed.
- Stock Photos by Envato
http://themeforest.net/page/asset_library
R) Version History - top
Version 1.0.7 - Current Version
- Fixed: Dynamic sidebar issue. (functions.php)
Version 1.0.6
- Fixed: fixed issue when using custom links as a top level menu item on navigation (css/style.css)
- Improved: contact_form.php
- Fixed: Wordpress 3.1 compatibility issues (header.php, functions.php, /rttheme_options/widgets/rt-theme-box-widget.php, /rttheme_options/widgets/rt-theme-news-widget.php, /rttheme_options/widgets/rt-theme-slider-widget.php)
- Fixed: Wordpress 3.1 compatibility issues related lightbox plugin (/js/scripts.js, /css/prettyPhoto.css, all files in /images/prettyPhoto/ folder)
- Fixed: Character support issue /rttheme_options/rt_theme_functions.php
- Other Improved Files: /rttheme_options/custom_form_2.php, comments.php, template_company_blog.php, functions.php, archive.php, search.php
Version 1.0.5
- Added WP 3 menu support. These files has been changed and adapted WP 3.0 (header.php, footer.php, template_blog.php, template_product_list.php, template_portfolio.php - all files under rttheme_options folder)
- improved (css/style.css - lines between 40-60, and .slide class on line 773)
Version 1.0.4
- Fixed bug on "Show Slider Icons" option (js/script.js)
- Fixed IE6 transparent.png bug (header.php)
- Improved (template_portfolio.php)
- Improved dynamic sidebars for pages (page.php)
- Dummy content included (XML file)
Version 1.0.3
- Fixed bug on "Don't Show Products On Start Page" option (template_product_list.php)
- Improved - Custom sidebars (controlpanel7.php, rt_theme_functions.pgp)
- Improved - (header.php)
Version 1.0.2
- Fixed Slider timeout bug - (js/scripts.js)
- Fixed contact us form bug - (contact_from.php, template_contact_us.php)
- Improved - (header.php)
Once again, thank you so much for purchasing this theme. As I said at the beginning, I'd be glad to help you if you have any questions relating to this theme. No guarantees, but I'll do my best to assist. If you have a more general question relating to the themes on ThemeForest, you might consider visiting the forums and asking your question in the "Item Discussion" section.
Tolga Can